
This guide describes the settings you should review before you start creating invoices or bookkeeping entries in SimplBooks.
Most settings are pre-configured in the software, so you may not need to change anything.
The guided setup wizard walks you through entering your company-specific details when you first log in. You can access the setup wizard from the icon available on every page until all steps have been completed.
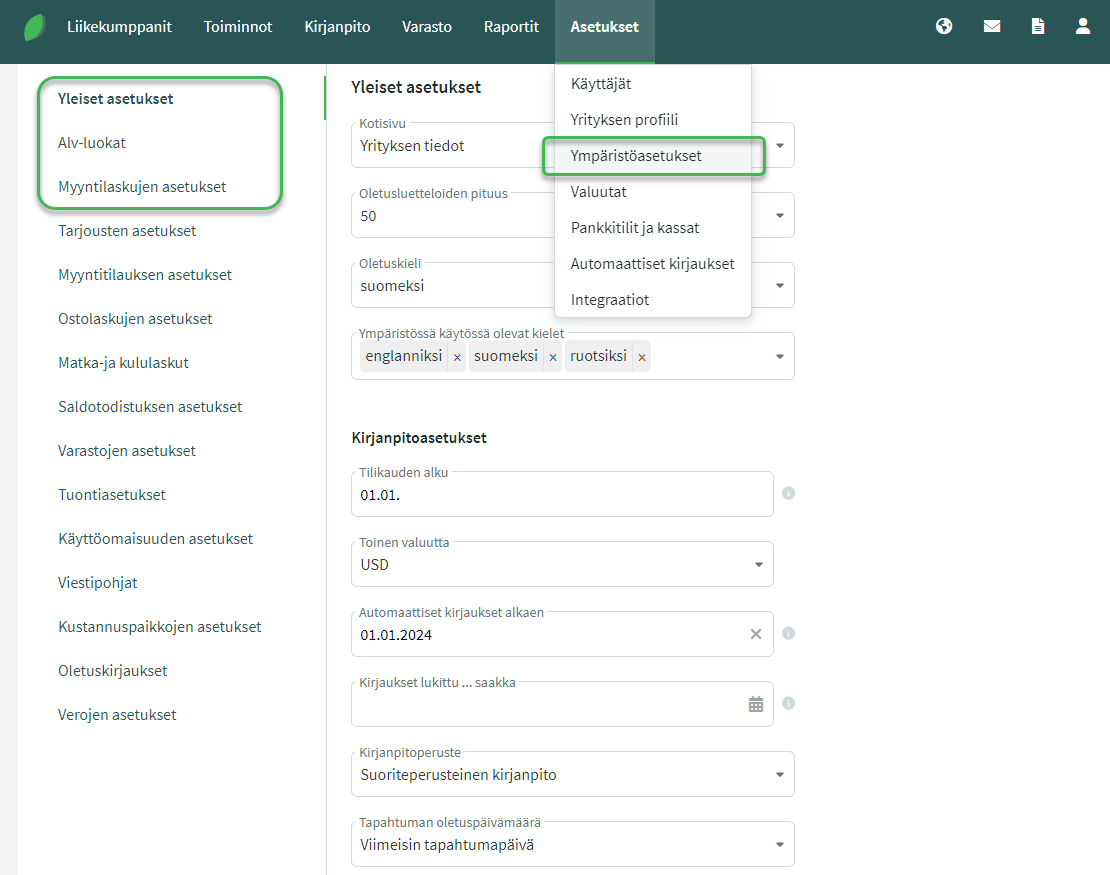
GENERAL SETTINGS
The financial year start date can be found, for example, on your company’s trade register extract. Always enter the regular recurring start date of the financial year, even if the first financial year is shorter or longer than 12 months. For example, if the financial year is the calendar year and the first financial year runs from 1 August 2023 to 31 December 2024, enter 1 January as the start date.
The automatic postings start date must be the same as or earlier than the date of the first entry you will make in the software. You can read more about automatic postings in our guide.
The “Entries locked until …” field lets you set a date up to which bookkeeping is finalised. Once a date is entered, entries up to that date are locked and no postings or changes can be made to earlier periods. We recommend locking entries whenever the bookkeeping for a given period is complete (and the VAT closing entry has been saved), and at the latest when the financial year’s bookkeeping is finalised.
The default transaction date determines how the date of a new entry is set. Options are the current (today’s) date or the most recent transaction date, i.e. the date of the last saved entry. The corresponding default date settings for sales and purchase invoices are found under “Sales Invoice Settings” and “Purchase Invoice Settings”.
VAT CATEGORIES (VAT SETTINGS)
The correct VAT rate must always be selected for sales and purchases, as they are reported in different fields on the VAT return. VAT settings do not need to be changed unless modifications are made to the chart of accounts.
- For sales, we recommend using a separate sales account for each VAT rate. The default chart of accounts includes accounts ready for sales at different VAT rates.
The VAT category settings have default accounts configured, so when the VAT rate is changed on a sales invoice, the software automatically posts the income to the correct ledger account:
- 24% > the software posts income to “3000 Sales VAT 24%”
- 14% > the software posts income to “3001 Sales VAT 14%”
- 10% > the software posts income to “3002 Sales VAT 10%”
SALES INVOICE SETTINGS
The invoice number format is pre-set in the software but can be changed if needed. You can read more about automatic numbering formats in our guide.
Reference number. You can specify whether the software generates a unique reference number for each invoice individually (by invoice) or uses the same reference number for the same customer on every invoice (by customer). The guide on reference number formats can be found here.
Invoice payment terms determine how many days of credit are added to a sales invoice by default. The due date can also be changed individually when creating each sales invoice. You can also set default payment terms per customer under Business Partners > Customers and Suppliers.
The content of the Additional information on invoice field is added to every sales invoice. You can enter, for example, a courtesy line (“Thank you for your business”) or an instruction (“Please use the reference number”) and similar text. The additional information text can also be edited individually on each invoice at the time of creation.
Document templates. The software includes ready-made invoice templates suitable for basic use, so you can start creating invoices straight away. Here you can create new invoice templates and edit them as needed. Detailed instructions for creating invoice templates can be found here.
Leave A Comment?